
 木盒主机
木盒主机关于甲基化的基础知识请自己学习了解,我们直接进行甲基化数据分析。
使用ChAMP包分析甲基化数据,这个包非常强大,甲基化数据分析必须得了解它。
这个包在bioconductor上,不要问我为什么install.packages("ChAMP")会失败,如果你有R包安装问题(包括任何R包安装问题),建议先看视频教程:
可能是最好用的R包安装教程
不过在使用ChAMP包的时候需要提供一个样本信息文件,.csv格式的,其实这个文件的准备非常简单。
ChAMP包给我们准备了一个示例数据集,我们先看一下示例数据是什么样的。
library("ChAMP")
testDir <- system.file("extdata",package="ChAMPdata")
在示例文件夹中的数据是这样的:
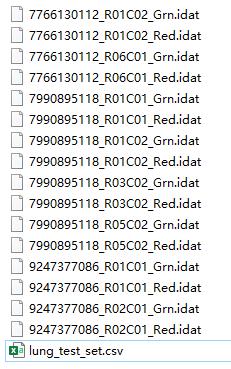
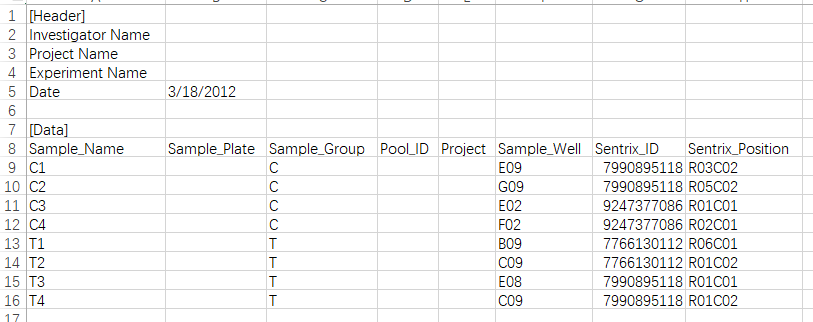
其中lung_test_set.csv就是样本信息,打开之后是这样的:
通常这个文件应该是作者给出的,但是很多时候都没有...
如果是你自己准备,需要注意以下几点:
- 这个csv文件中必须有的是
Sentrix_ID、Sentrix_Position,而且这两个名字不能改;这两列用_连接起来,就是你的IDAT文件的名字,而且必须用_连接,不然读取不了,所以你的IDAT文件的名字也必须得有_; Sample_Group这一列是分组信息(比如control和treat,normal和tumor等),没有这列信息也是可以读取的,但是没法做接下来的很多分析;这个名字可以改,但是在使用一些函数时也要跟着改;Sample_Name这一列是你的样本名字,没有这列信息也是可以读取的,但是有了更好,因为在过滤样本时要用;这个名字不能改;- 其余列可有可无,根据自己的需要来,比如你的数据如果有批次效应,你可以自己增加一列批次效应的信息,列名随便取,使用时指定即可;
- 上面示例csv文件中的前7行,没什么用,不需要;
- 这个文件夹中必须有且只有1个csv文件,文件名随便取。
如果没有Sample_Name这一列,就会出现下面的提示,所以Sample_Name这一列最好有,过滤样本时使用。Sample_Name这一列是你的样本名。
[ Section 1:  Check Input Start ]
  You have inputed beta,intensity for Analysis.

  pd file provided, checking if it's in accord with Data Matrix...
    !!! Your pd file does not have Sample_Name column, we can not check your Sample_Name, please make sure the pd file is correct.
如果你了解过minfi包,就会发现它们需要的这个文件是一样的,因为ChAMP读取这个数据是基于minfi包的。。。
下面用一个实际的例子来说明。
样本信息文件的制作
使用GSE149282这个数据集演示,一共24个样本,12个癌症,12个正常。下面这个分组信息可以直接从 https://www.ncbi.nlm.nih.gov/geo/query/acc.cgi?acc=gse149282 这个网页上复制粘贴即可,使用了之前介绍过的datapaste。
复制粘贴不走样的神奇R包,帮你快速从网页复制数据!
# 构建临床信息文件
# 粘贴过来稍加整理一下
pd <- data.frame(stringsAsFactors = FALSE,
                 Sample_Name = c("GSM4495491","GSM4495492","GSM4495493",
                        "GSM4495494","GSM4495495","GSM4495496",
                        "GSM4495497","GSM4495498","GSM4495499",
                        "GSM4495500","GSM4495501","GSM4495502",
                        "GSM4495503","GSM4495504","GSM4495505",
                        "GSM4495506","GSM4495507","GSM4495508",
                        "GSM4495509","GSM4495510","GSM4495511",
                        "GSM4495512","GSM4495513","GSM4495514"),
                 type = c("Colon adjacent normal 194T",
                          "Colon cancer tissue 194T",
                          "Colon adjacent normal 466T",
                          "Colon cancer tissue 466T",
                          "Colon adjacent normal 469T",
                          "Colon cancer tissue 469T",
                          "Colon adjacent normal 398T",
                          "Colon cancer tissue 398T",
                          "Colon adjacent normal 361T",
                          "Colon cancer tissue 361T",
                          "Colon adjacent normal 456T",
                          "Colon cancer tissue 456T",
                          "Colon adjacent normal 353T",
                          "Colon cancer tissue 353T",
                          "Colon adjacent normal 439T",
                          "Colon cancer tissue 439T",
                          "Colon cancer tissue 501T",
                          "Colon adjacent normal 501T",
                          "Colon cancer tissue 449T",
                          "Colon adjacent normal 449T",
                          "Colon cancer tissue 474T",
                          "Colon adjacent normal 474T",
                          "Colon cancer tissue 467T",
                          "Colon adjacent normal 467T")
)
我们需要把IDAT的文件名字加到pd中,并且把它们变成两列:Sentrix_ID和Sentrix_Position。
首先获取文件夹中IDAT文件名,后缀(_Red.idat/_Grn.idat)就不用了:
idat.name <- list.files("./gse149282/GSE149282_RAW/",
                        pattern = "*.idat.gz") |>
  substr(1L,30L)

idat.name
##  [1] "GSM4495491_200811050117_R01C01" "GSM4495491_200811050117_R01C01"
##  [3] "GSM4495492_200811050117_R02C01" "GSM4495492_200811050117_R02C01"
##  [5] "GSM4495493_200811050117_R03C01" "GSM4495493_200811050117_R03C01"
##  [7] "GSM4495494_200811050117_R04C01" "GSM4495494_200811050117_R04C01"
##  [9] "GSM4495495_200811050117_R05C01" "GSM4495495_200811050117_R05C01"
## [11] "GSM4495496_200811050117_R06C01" "GSM4495496_200811050117_R06C01"
## [13] "GSM4495497_200811050117_R07C01" "GSM4495497_200811050117_R07C01"
## [15] "GSM4495498_200811050117_R08C01" "GSM4495498_200811050117_R08C01"
## [17] "GSM4495499_200811050116_R01C01" "GSM4495499_200811050116_R01C01"
## [19] "GSM4495500_200811050116_R02C01" "GSM4495500_200811050116_R02C01"
## [21] "GSM4495501_200811050116_R03C01" "GSM4495501_200811050116_R03C01"
## [23] "GSM4495502_200811050116_R04C01" "GSM4495502_200811050116_R04C01"
## [25] "GSM4495503_200811050116_R05C01" "GSM4495503_200811050116_R05C01"
## [27] "GSM4495504_200811050116_R06C01" "GSM4495504_200811050116_R06C01"
## [29] "GSM4495505_200811050116_R07C01" "GSM4495505_200811050116_R07C01"
## [31] "GSM4495506_200811050116_R08C01" "GSM4495506_200811050116_R08C01"
## [33] "GSM4495507_202193490061_R01C01" "GSM4495507_202193490061_R01C01"
## [35] "GSM4495508_202193490061_R02C01" "GSM4495508_202193490061_R02C01"
## [37] "GSM4495509_202193490061_R03C01" "GSM4495509_202193490061_R03C01"
## [39] "GSM4495510_202193490061_R04C01" "GSM4495510_202193490061_R04C01"
## [41] "GSM4495511_202193490061_R05C01" "GSM4495511_202193490061_R05C01"
## [43] "GSM4495512_202193490061_R06C01" "GSM4495512_202193490061_R06C01"
## [45] "GSM4495513_202193490061_R07C01" "GSM4495513_202193490061_R07C01"
## [47] "GSM4495514_202193490061_R08C01" "GSM4495514_202193490061_R08C01"
把IDAT文件名添加到pd信息中去,由于我的这个例子中有两个_,所以你以任何一个_把它分为两部分都是可以的:
pd$Sentrix_ID <- substr(idat.name[seq(1,47,2)],1,23) #第一部分
pd$Sentrix_Position <- substr(idat.name[seq(1,47,2)],25,30) #第二部分
添加分组信息,我这个示例文件是分为normal和tumor两组:
pd$Sample_Type <- stringr::str_split(pd$type,pattern = " ",simplify = T)[,2]
pd[pd == "adjacent"] <- "normal"
pd <- pd[,-2]
这样这个pd样本信息文件就做好了:
head(pd)
##   Sample_Name              Sentrix_ID Sentrix_Position Sample_Type
## 1  GSM4495491 GSM4495491_200811050117           R01C01      normal
## 2  GSM4495492 GSM4495492_200811050117           R02C01      cancer
## 3  GSM4495493 GSM4495493_200811050117           R03C01      normal
## 4  GSM4495494 GSM4495494_200811050117           R04C01      cancer
## 5  GSM4495495 GSM4495495_200811050117           R05C01      normal
## 6  GSM4495496 GSM4495496_200811050117           R06C01      cancer
保存为CSV文件,文件名随便取即可:
write.csv(pd,file = "sample_type.csv",row.names = F,quote = F)
把这个csv文件和你的IDAT文件放在一个文件夹下就可以顺利读取了。
读取文件
# 加载R包
suppressMessages(library(ChAMP))
# 指定文件夹路径
myDir="./gse149282/GSE149282_RAW/"

## 我用的数据是Infinium MethylationEPIC,所以选EPIC,不要乱选哦!
myLoad <- champ.load(myDir, arraytype="EPIC")
OK,这样就非常顺利的读取成功了!
使用champ.load()函数可以直接读取IDAT文件(必须在同一个文件夹提供分组信息csv文件),在老版本的中这一步是借助minfi包实现的,但是现在默认是基于ChAMP方法实现的。主要不同是老版本的方法会同时返回rgSet和mset对象。这两种方法可以通过method参数切换。
champ.load()在读取数据时会自动过滤SNP,SNP信息主要来源于[这篇文章](Zhou W, Laird PW, Shen H. Comprehensive characterization, annotation and innovative use of infinium dna methylation beadchip probes. Nucleic Acids Research. Published online 2016. doi:10.1093/nar/gkw967 "SNP参考信息")。
champ.load()函数其实是champ.import()和champ.filter()两个函数的结合版,如果你想获得更加精细化的结果,需要使用两个函数。
如果你认真读上面的日志信息,也能发现champ.load()函数就是主要分为了两个步骤:champ.import()和champ.filter()。
首先是champ.import()部分:
第一件事:读取你的csv文件:
[ Section 1: Read PD Files Start ]
  CSV Directory: ./gse149282/GSE149282_RAW/sample_type.csv
  Find CSV Success
  Reading CSV File
  Replace Sentrix_Position into Array
  Replace Sentrix_ID into Slide
  There is NO Pool_ID in your pd file.
  There is NO Sample_Plate in your pd file.
  There is NO Sample_Well in your pd file.
[ Section 1: Read PD file Done ]
第二件事才是读取你的IDAT文件,在这一步还会给你很多提示信息:
[ Section 2: Read IDAT files Start ]
### 省略很多过程 ###

 !!! Important !!!
  Seems your IDAT files not from one Array, because they have different numbers of probe.
  ChAMP wil continue analysis with only COMMON CpGs exist across all your IDAt files. However we still suggest you to check your source of data.


  Extract Mean value for Green and Red Channel Success
    Your Red Green Channel contains 1051815 probes.
[ Section 2: Read IDAT Files Done ]
第三步,添加注释信息:
[ Section 3: Use Annotation Start ]

  Reading EPIC Annotation >>

  Fetching NEGATIVE ControlProbe.
    Totally, there are 411 control probes in Annotation.
    Your data set contains 411 control probes.

  Generating Meth and UnMeth Matrix
    Extracting Meth Matrix...
      Totally there are 865918 Meth probes in EPIC Annotation.
      Your data set contains 865918 Meth probes.
    Extracting UnMeth Matrix...
      Totally there are 865918 UnMeth probes in EPIC Annotation.
      Your data set contains 865918 UnMeth probes.

  Generating beta Matrix
  Generating M Matrix
  Generating intensity Matrix
  Calculating Detect P value
  Counting Beads
[ Section 3: Use Annotation Done ]
然后是champ.filter()的部分。
在这一部分首先是check input,给出的信息可以说是太全面了!
[ Section 1:  Check Input Start ]
  You have inputed beta,intensity for Analysis.

  pd file provided, checking if it's in accord with Data Matrix...
    pd file check success.

  Parameter filterDetP is TRUE, checking if detP in accord with Data Matrix...
    detP check success.

  Parameter filterBeads is TRUE, checking if beadcount in accord with Data Matrix...
    beadcount check success.

  parameter autoimpute is TRUE. Checking if the conditions are fulfilled...
    !!! ProbeCutoff is 0, which means you have no needs to do imputation. autoimpute has been reset FALSE.

  Checking Finished :filterDetP,filterBeads,filterMultiHit,filterSNPs,filterNoCG,filterXY would be done on beta,intensity.
  You also provided :detP,beadcount .
[ Section 1: Check Input Done ]
check input之后就是过滤,根据你的input提供的信息进行各种过滤!
主要是6步过滤:
- First filter is for probes with detection p-value (default > 0.01).
- Second, ChAMP will filter out probes with <3 beads in at least 5% of samples per probe.
- Third, ChAMP will by default filter out all non-CpG probes contained in your dataset.
- Fourth, by default ChAMP will filter all SNP-related probes.
- Fifth, by default setting, ChAMP will filter all multi-hit probes.
- Sixth, ChAMP will filter out all probes located in chromosome X and Y.
  Filtering probes with a detection p-value above 0.01.
    Removing 7176 probes.
    If a large number of probes have been removed, ChAMP suggests you to identify     potentially bad samples

  Filtering BeadCount Start
    Filtering probes with a beadcount <3 in at least 5% of samples.
    Removing 4832 probes

  Filtering NoCG Start
    Only Keep CpGs, removing 2953 probes from the analysis.

  Filtering SNPs Start
    Using general EPIC SNP list for filtering.
    Filtering probes with SNPs as identified in Zhou's Nucleic Acids Research Paper 2016.
    Removing 96223 probes from the analysis.

  Filtering MultiHit Start
    Filtering probes that align to multiple locations as identified in Nordlund et al
    Removing 11 probes from the analysis.

  Filtering XY Start
    Filtering probes located on X,Y chromosome, removing 16458 probes from the analysis.

  Updating PD file

  Fixing Outliers Start
    Replacing all value smaller/equal to 0 with smallest positive value.
    Replacing all value greater/equal to 1 with largest value below 1..
[ Section 2: Filtering Done ]

 All filterings are Done, now you have 738265 probes and 24 samples.

[<<<<< ChAMP.FILTER END >>>>>>]
上面所有的过滤都是可以通过参数控制的!真是太全面了!
需要注意,如果你只有beta matrix,champ.load()函数是不能执行某些过滤的,这时候你需要用champ.import()+champ.filter()。
myImport <- champ.import(myDir,)
myLoad <- champ.filter()
千万要注意这两个函数里面的参数选择哦!!
以上就是ChAMP包需要的样本信息csv文件的制作以及IDAT数据读取过程,下次继续!
未经允许不得转载:木盒主机 » ChAMP分析甲基化数据:样本信息csv的制作和IDAT读取
 搬瓦工VPS最新优惠码 搬瓦工最高优惠6.81%优惠码 promo coupon code
  RackNerd:美国VPS 黑五优惠折扣 1核768RAM $10.28/年+神秘盒子 可随机减免金额
 10G.BIZ【年终钜惠】美国/日本/韩国/香港独立服务器 秒杀仅24起,站群仅需99,三网CN2GIA五折抢购。CERA洛杉矶云服务器仅2.4起
 2022年RackNerd 美国VPS促销:4TB月流量11.88美元/年,支持支付宝,老优惠$9.89美元/年